


Original price was: $89.95.$70.16Current price is: $70.16.
- Top-Notch Quality
- The best quality products, always.
- Shop with Confidence
- Secure Shopping with Safe Payments

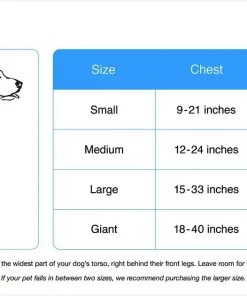
Details
- Transmitter uses tone and static corrections to keep pets out of certain areas.
- Adjustable barrier range protects areas in a 2-10-foot radius.
- Designed for indoor use only, and can accommodate additional pets (with collars).
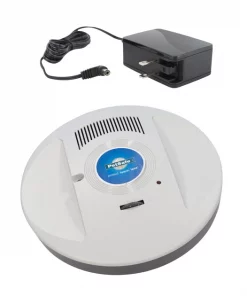
- Comes with barrier transmitter, power adapter, operating and training guides.
- Compatible with most PetSafe In-Ground Fence receiver collar (sold separately).
Keep your pet out of those off-limit areas with the PetSafe Indoor Radio Fence Transmitter for Cats & Dogs. This is an avoidance product that uses tone and static corrections to remind your furry friend there are certain places they should not be, whether it’s the baby’s nursery, kitchen or your brand new sofa. This transmitter protects areas with up to a 10 feet radius and is compatible with any PetSafe In-Ground Fence receiver collar (sold separately) excluding the YardMax and Pawz Away collars. Maintain the peace of mind knowing your pet is where he is supposed to be with this product from PetSafe.
Specifications
| Item Number | 160790 |
|---|---|
| Range of Coverage | 20 feet |
| Lifestage | Adult |
| Breed Size | N/A |
| Features | Adjustable Correction, Indoor, Wireless |
| Collar Type | Fence System – Noise, Fence System – Static |
| Compatibility | Plug-In Power |
What’s Included
Indoor Radio Fence, Powder Adapter & Product Manual.
Precautions
Receiver collar required (sold separately).
Instructions
1. Install the Barrier Transmitter.
The barrier transmitter emits a radio signal from all sides in a spherical pattern. The signal will transmit through a wall or the ceiling/floor. The barrier transmitter is designed to be placed laying flat on a surface.
2. Set Up the Barrier Transmitter.
- Plug the power adapter into the power jack and a standard 120 volt outlet.
- Adjust the dial clockwise from 2 to 8. The power light will turn red indicating that the unit is turned on.
- You can create a barrier area from 2 ft. in radius up to 10 ft. in radius by adjusting the dial from 2 (minimum range) to 8 (maximum range).
3. Test the Barrier Area.
- Refer to your receiver collar operating
guide for setup instructions and proper
use of the test light tool. - Place the test light tool that came
with your In-Ground Fence system
on the contact points of the receiver
collar. Hold the receiver collar at the
approximate height of your dog’s
neck (3A). Start outside of the range
and walk slowly toward the barrier
transmitter. As you reach the barrier
area, the receiver collar emits a series
of high-pitched tones. For each tone
you hear, you should notice the test
light flashing, which indicates that a
static correction is being delivered. The receiver collar’s tone is easily
heard by dogs, but may be difficult for us humans to hear. - Check the range of the barrier area from multiple angles to ensure that
you are getting the desired coverage.
Begin Your Pet’s First Training Session
- Move your pet away from the barrier area.
- Turn on the receiver collar and set to the appropriate level for your pet.
- Allow your pet to wander freely to learn the new boundaries.
Further Training
If your pet is confused or unsure of how to avoid the barrier areas, then you may need to teach your pet how to do so by following these easy training steps:
1. Place a second non metallic collar on your pet below the receiver collar and attach a long leash.
Be sure the extra collar does not put pressure on the contact
points of the receiver collar.
2. Turn on the receiver collar and set to the appropriate level for your pet. Walk your pet toward the barrier area. As soon as you hear the tone or you see that your pet is receiving a static correction, gently pull him away from the barrier area and back into the safe zone.
3. Reward your pet with praise each time he leaves the barrier area.
4. Practice this technique a few times until you feel that your pet is mastering avoidance of the barrier areas.
Never force or entice your pet to enter the barrier areas.
FAQ
Barrier transmitter does not appear to work.
- Check that the power light is red to indicate that it
has been turned on - Make sure the power adapter is plugged into a
working 120 volt outlet - Verify that the outlet is working properly by plugging
in a known working item such as a radio - If the power light still does not come on, the barrier
transmitter and/or the power adapter needs to be
replaced - Increase the barrier area range on the
barrier transmitter
Barrier area range is too low.
- Check the receiver collar battery status
- Adjust the barrier transmitter range to increase the
barrier area size
Barrier area range is too high. Adjust the barrier transmitter range to decrease the barrier area size.
| Color | White |
|---|
Be the first to review “PetSafe Indoor Radio Fence Transmitter for Cats & Dogs”
Related products
Bark Control & Remote Training


Crates, Pens & Gates


Crates, Pens & Gates

Bark Control & Remote Training

Bark Control & Remote Training
SportDOG SDT00-11907 SD-400 & SD-800 Series Receiver Battery Kit
Reviews
There are no reviews yet.