


Original price was: $214.95.$167.66Current price is: $167.66.
- Top-Notch Quality
- The best quality products, always.
- Shop with Confidence
- Secure Shopping with Safe Payments

Details
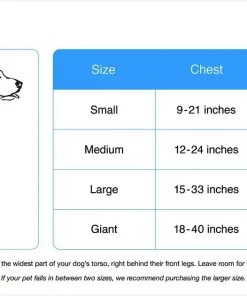
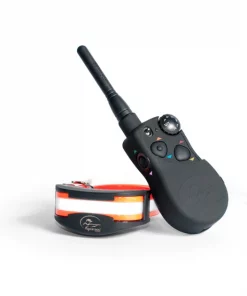
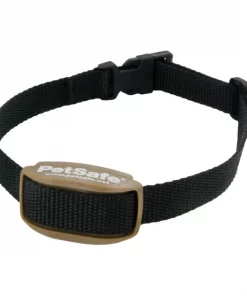
- Waterproof receiver collar for dogs 8 pounds and up, or neck sizes 6-28 inches.
- Covers up to 1/3 acre with included wire, expandable up to 25 acres with additional boundary wire (not included).
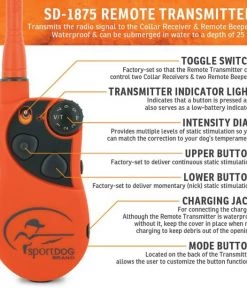
- 4 adjustable levels of static correction with highest intensity levels available, tone with vibration option alerts your pet with a beep and vibration. Run Through Prevention- Correction increases if your dog tries to run through the boundary zone.
- Low battery indicator Collar uses PetSafe 9-Volt PAC11-12067 battery (included).
- Works with multiple dogs and cats (additional receiver collars required).
Some pups prefer to be the boss and wander to their heart’s content, but pet parents know: it’s a jungle out there! The PetSafe Stubborn Dog In-Ground Fence System has 4 higher-intensity settings than standard in-ground fences and gives an audible when hard-headed hounds get too close to the boundary. For older pets or pups with selective hearing, a vibration-only mode gets their attention and reminds them that rules are there for a reason and there’s plenty of fun to be had in the yard.
Specifications
| Item Number | 63894 |
|---|---|
| Range of Coverage | 1/3 acre |
| Lifestage | Adult |
| Breed Size | N/A |
| Features | Adjustable Correction, Low Battery Indicator, Waterproof |
| Collar Type | Fence System – Noise, Fence System – Static, Fence System – Vibration |
| Neck Size | 6 to 27 inches |
| Recommended Pet Weight | 8 pounds & up |
| Compatibility | Battery Powered, Plug-In Power |
What’s Included
Transmitter with power adapter, receiver collar with 9-Volt alkaline battery, test light tool, operating and training guide, (50) boundary training flags, 500 feet of wire, wire nuts and gel-filled capsules.
Precautions
Avoid leaving the collar on for more than 12 hours a day. Please refer to packaged instructions for additional details.
Instructions
Troubleshooting
Receiver Collar is not beeping or correcting.
- Check battery to make sure it is installed properly.
- Check that both lights are lit on the Fence Transmitter. If not, perform the “System Test” (page 26).
The Receiver Collar is beeping, but the pet is not responding to the Static Correction.
- Test the Receiver Collar with the Test Light walking toward the Boundary Wire.
- If the Test Light flashes, check the fit of the Receiver Collar.
- Trim your pet’s fur where the Contact Points touch the neck and/or switch to the longer
Contact Points. - Increase the Static Correction Level.
- Repeat training steps to reinforce training.
The Receiver Collar has to be held on top of the Boundary Wire to activate.
- Replace battery.
- Adjust Boundary Width Control knob clockwise to increase the distance from the Boundary Wire that the Receiver Collar activates. Verify the Boundary Control Switch is placed at the proper setting according to the amount of Boundary Wire used. (See Step 6)
- If using a Double Loop, make sure Boundary Wires are separated at least 5 feet.
- If the Receiver Collar still has to be held on top of the Boundary Wire, perform the “System Test”.
The Receiver Collar activates inside the house.
- Turn the Boundary Width Control knob
counterclockwise to decrease the distance from the
Boundary Wire that the Receiver Collar activates. - Make sure the Boundary Wire is not running within 15 feet of the house. The signal can transmit through the walls of your house.
- Make sure Boundary Wires are twisted from Boundary to the Fence Transmitter
The Receiver Indicator Light is flashing every 4 to 5 seconds and I have just installed a new battery.
- To reset the low battery indicator, remove the battery from the Receiver Collar. Discharge all
power by holding the correction level button down until the light is no longer illuminated. Reinstall battery.
I have an inconsistent signal.
- Make sure Fence Transmitter is at least 3 feet from large metal objects or appliances.
- Make sure all Boundary Wire turns are gradual with a minimum 3 foot radius.
- Make sure the Boundary Wire is not running parallel to and within 10 feet of electrical wires, neighboring containment systems, telephone wires, television or antenna cables, or satellite dishes.
- If a neighboring containment system may be causing an inconsistent signal, move the Boundary Wire farther away from the neighboring containment system.
The Power and Loop Indicator Lights are off.
- Check that the Power Adapter is plugged into the Fence Transmitter.
- Check that the Power Adapter is plugged in properly.
- If the system is plugged into a GFCI or RCD outlet, check to see if the circuit has been tripped. Reset the GFCI or RCD circuit if required.
- Verify that the outlet is working properly by plugging in a known working item such as a radio.
- Try plugging into another 120-volt outlet.
- If the lights still do not come on, the Fence Transmitter and/or Power Adapter needs to be
replaced. - If a Surge Protector is installed, unplug the Surge Protector and plug the power adapter
directly into the outlet.
The Power Light is on, the Loop Indicator Light is off, and the Fence Transmitter loop alarm is sounding.
- Check Boundary Wire connections at the Fence Transmitter for proper connection.
- Check for broken or damaged Boundary Wires at outside entry to the house.
- Perform the “System Test” (page 26) to determine if the Fence Transmitter or Surge Protector needs to be replaced.
- If the Fence Transmitter is functioning properly, you have a break in your Boundary Wire.
See the “Wire Break Location Test” (page 27) section in this guide.
Size
The proper fit and placement of your receiver collar is important for effective training. The contact points must have direct contact with your pets skin on the underside of their neck.
-
Make sure the receiver collar is turned off.
-
Start with your pet standing comfortably.
-
Center the contact points underneath your pets neck, touching the skin. If your pet has a long or thick coat, consider using the long contact points to reach through the fur. These can be purchased online or from our Customer Care Center. Note: It is sometimes necessary to trim the hair around the contact points to make sure that contact is consistent.
- Check the tightness of the receiver collar by inserting one finger between the end of a contact point and your pets neck. The fit should be snug but not constricting.
-
Allow your pet to wear the collar for several minutes then recheck the fit. Check the fit again as your pet becomes more comfortable with the receiver collar.
-
If you’d like to to trim the collar strap, mark the desired length of the receiver collar with a pen. Allow for growth if your pet is young or grows a thick winter coat. Remove the receiver collar from your pet and cut off the excess. If your receiver has a nylon strap, seal the edge of the cut collar by applying a flame along the frayed edge.
If your collar is a QuickFit collar, it is designed so you can quickly attach and remove the Receiver Collar from your pet while maintaining the desired fit.
-
With the Snap Buckle fastened, thread the collar through the Metal Buckle.
-
Slide the excess collar through the “C” Loop on top of the Snap Buckle. This will hold the excess collar in place.
-
Once the collar fit is determined, use the Snap Buckle to remove and replace the collar.
Replacing the Receiver on a New Collar Strap
-
Slide the receiver off the old strap.
-
Slide the receiver on the new strap.
-
Adjust the slide buckle so the collar won’t become loose around your pet’s neck.
-
Make sure the ridges are facing up or the collar may slip.
Be the first to review “PetSafe Stubborn Dog In-Ground Fence System”
Related products

Bark Control & Remote Training
Crates, Pens & Gates


Bark Control & Remote Training
SportDOG SAC00-12544 SR-300 Replacement Receiver Battery Kit

Crates, Pens & Gates


Crates, Pens & Gates
Bark Control & Remote Training
Reviews
There are no reviews yet.